
Everyone who’s been quilting for a while has some favourite tips and tricks they’ve either picked up along the way or they’ve figured out on their own. These tips make their quilting easier or more fun. Here are some of my favourite ones.
Binding
I generally do my binding (the fabric that surrounds the edges of the quilt) by sewing it to the front and then hand stitching it down to the back. I don’t like machine binding because I can never make it look as good as I want. But regardless of how I’m going to do my binding, it needs to be attached to the quilt in the first place.
One of the things I struggled with was having this long, long strip of fabric – over 200 inches in many cases, hanging over the edge of my sewing table. I’d put it in my lap, throw it over my shoulder, and who knows what else I’ve tried. Until one day, I tried something new.
I rolled up the binding and then inserted my sewing machine’s table extension leg through the middle. It held my roll and released the fabric as I needed it. My next machine didn’t have a table with a leg I could use, so I put the roll on the extra spool spindle on top. That worked well until I had a machine that didn’t have a spool holder that stood upright. What to do? I used my nearby spool holder that holds the thread for my embroidery machine. Problem solved!


Getting my ¼ seam
Some machines are more accurate than others when it comes to seam sizes. I’ve used machines that have a quarter of an inch marked off on the plate and when I measured it, it was nowhere near a quarter inch. I even once had a quarter inch foot that wasn’t accurate. So I made my own guide:
I use this to move my needle position until it is where I want it to be, no matter what width I need. I also have a magnetic seam guide for my Singer Featherweight and I use this homemade guide to place it.

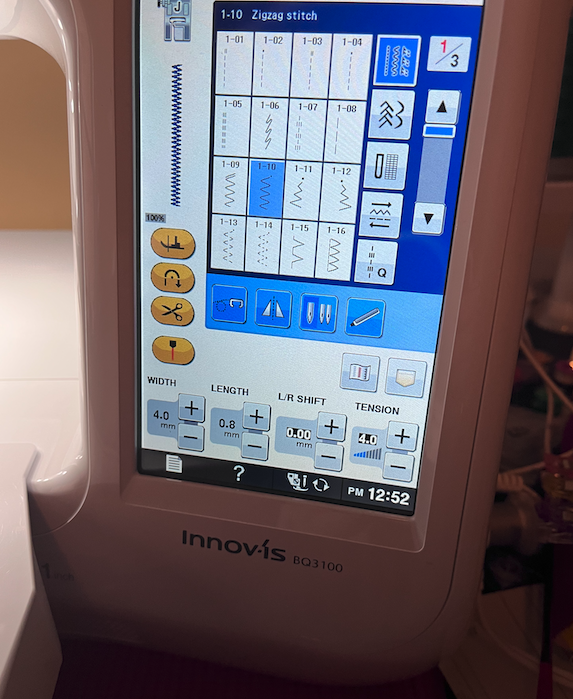
Keeping track of stitch widths and lengths
When I was working on the Beast Quilt, I was using a Brother mechanical machine for both straight seams and zigzagging. When I turned the machine off, it kept the settings. So if it was set for a certain size zigzag, it was still that way when I turned the machine back on later. When I needed to join the blocks I’d just appliqued, I had to change the settings back to the straight stitch. When I was ready to applique again, I had to reset the stitching to the same size zigzag stitch I’d used before.
The first few times, I had to try to remember the width and length until I realized, why not just take a photo of the settings? I did and then I taped the photo on the wall for future reference.
This trick is also good for electronic machines. The last couple of rows of the Beast Quilt were done on my new electronic machine. Unless I set up my zigzag size as a special stitch in the memory, once I turned off the machine, it went back to the default size zigzag. When I turned the machine back on, I have to reset it to the right size. Photo to the rescue!

More uses for photos
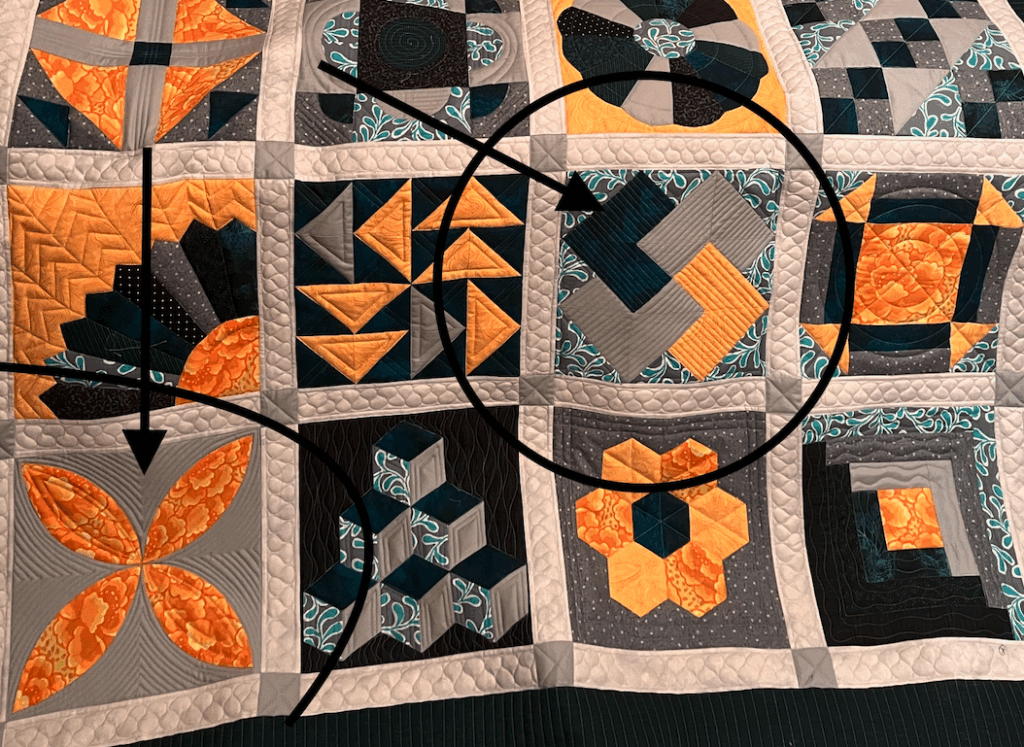
Many of my quilting designs are spontaneous. I don’t usually have a specific idea in mind but I just go with what seems right at the time. The problem with that approach is as the quilt is rolled up on the frame, I can’t see what I’ve done at the top and I can almost guarantee I’ve forgotten by the time I get half way down. This is particularly important when we’re looking at the borders. How did I join the motifs on the right and left sides to the top? I need to know this so I can do the same at the bottom. So I take pictures of the completed quilting and I can refer to them as I progress down the quilt.
In January, fellow guild member, Anna Marret, asked me if I’d quilt a sampler quilt for her. Of course! She brought me a lovely sampler top and she mentioned she didn’t want anything fancy, just nice quilting to enhance the blocks. Challenge on! (You can see her quilts in this post.)
Each square was quilted differently, but there were similarities in a few. Some had many densely spaced lines around or inside a design, while others had swirls and curves. For balance, it was important not to have too many blocks with the same sorts of quilting elements in a row or column because it would throw off the visual appeal. So, as I rolled up the quilt, I’d take photos of each row. If I knew a block directly above the new row had swirls and curves, or dense lines, I’d opt for a different pattern for this new block.
Here’s what I mean. Check out the circled blocks. They both had intense line quilting, so I wanted to make sure they weren’t too close together.
Do you have any favourite tips and tricks you like to share? You can send them to me through my contact form and I’ll share them in another post.